Safe Aircraft Initiative
Advanced System Safety Software

AFTV v.1 User Manual, last updated on 9/11/2008.
I. Windows
Click screenshots for full size view
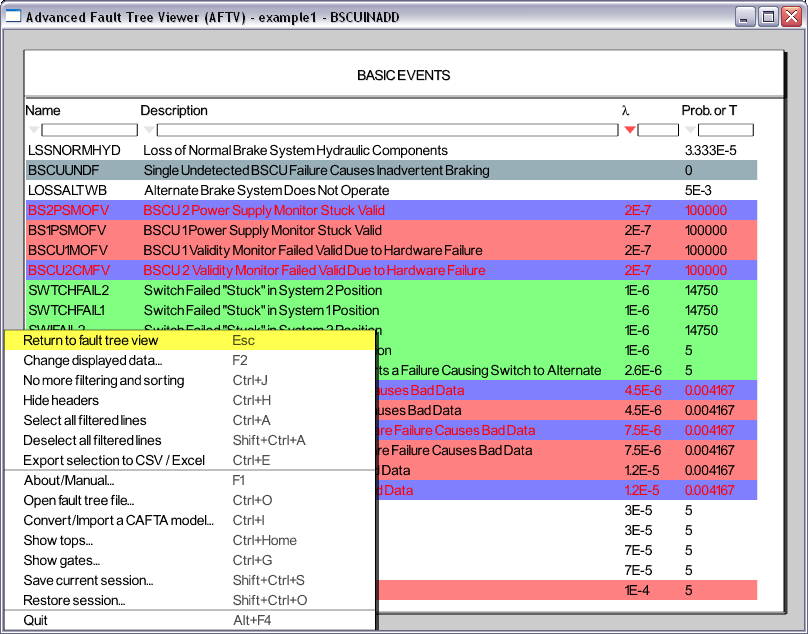
I.1. Fault Tree View
To return to this view from any other window press the "Esc" key.
Mouse commands
 Turn the wheel up/down to zoom in/out Click and drag with left button moves the fault tree Double click with left button on the background to deselect all cells Right button click calls the contextual menu
Commands available in all windows
About/Manual... (F1) Open fault tree file... (Ctrl+O) Convert/Import a CAFTA model... (Ctrl+I) Show tops... (Ctrl+Home) Show basic events... (Ctrl+B) Show gates... (Ctrl+G) Show type codes... (Ctrl+T) Save current session (Shift+Ctrl+S) Restore session (Shift+Ctrl+O) Quit (Alt+F4)Menu commands specific to this view
Change view: Make this gate a page top (Page Down) Develop / Close gate (Ctrl+L) Show fully developed tree / No more fully developed tree (Ctrl+Shift+F12) Display all cell data / No display of all cell data (F9) Show page top gate (F10)Manage Selection:
Double click with left button on the background to deselect all cells Select / Deselect gate / basic event (F5) Select / Deselect all cells with this color (Ctrl+F5) Select / Deselect this gate and below (F6) Select / Deselect this gate / basic event and above (F7) Select everything below selection (Shift+F6) Select everything above selection (Shift+F7) Find... (Ctrl+F) Find next selection (F3) Find previous selection (Shift+F3)Manage Color:
Colorize [selection] (F8) Colorize [selection] with new color... (Shift+F8) Clear color [of selected cells] (Ctrl+F8) Capture color (Shift+Ctrl+F8) Turn color blending on/off (Alt+F8)Note that all the previous functions are not available at all times. Most of the AFTV menus are contextual so that only the pertinent commands are displayed. The availability of each menu may depend on both the context and the element in focus (e.g., background, gate, basic event, selected cell, colorized cell, etc.).
By itself, the Fault Tree View concentrates most of the commands available in AFTV.
The commands are presented in this section but are detailed in section II.
I.2. Top Events
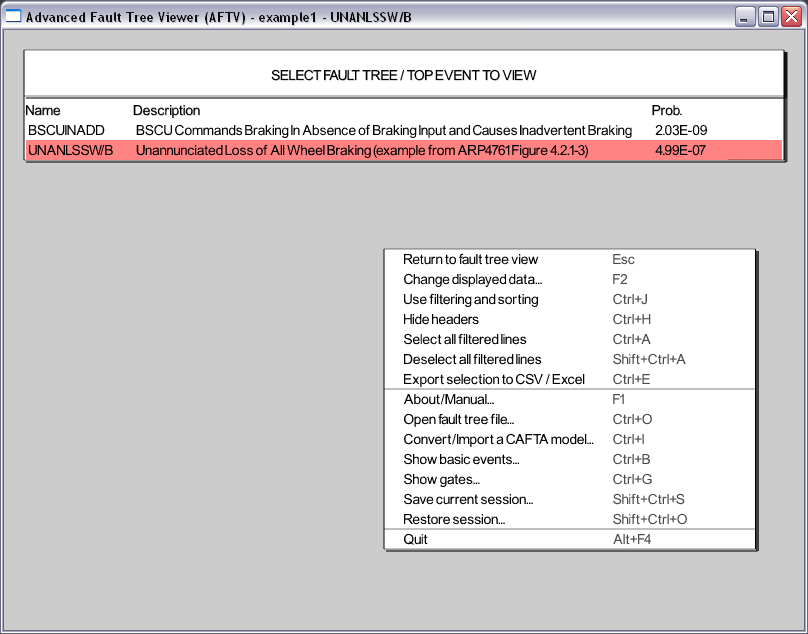
Note that once the top event selected, it is shown at the end of the AFTV title bar, unless there is only one fault tree in the fault tree file.
Sorting and Filtering
The top events are shown with their color and selection status. In the header area of each column, clicking on the triangle will sort on this column (click twice to toggle ascending/descending). The red triangle indicates the active sort column. The rectangle above each column is used to filter the displayed list.The filter pattern syntax is the following:
Filter pattern syntax
The search is not case sensitive The "?" can be used to replace any single character The "*" can be used to replace any string of characters For numerical data, it is also possible to filter the list using a relational operator followed by a number.
The valid relational operators are =, <>, <, >, <=, and >=.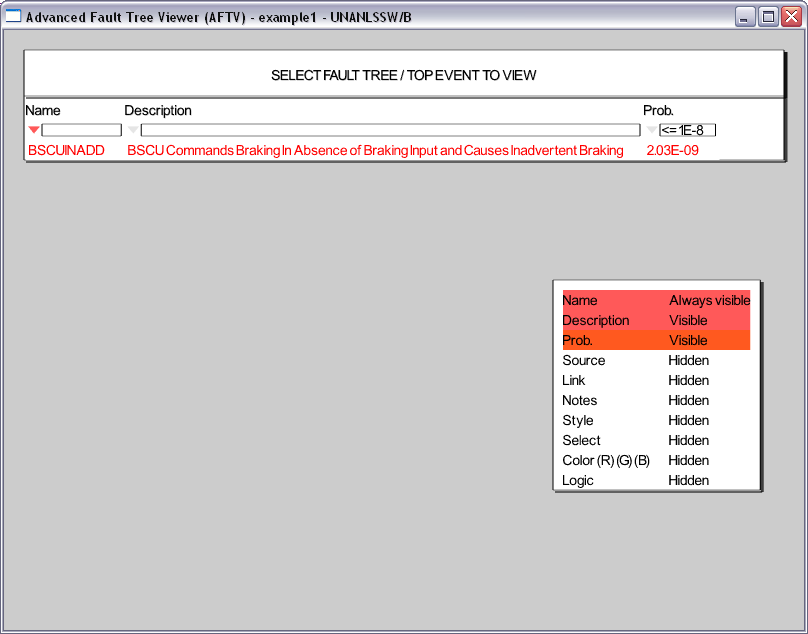
List customization
Except for the top event name which is always shown in the first column, all the other columns can be shown or not using the "Change displayed data... (F2)" menu. The order of the columns can also be changed using this same menu.Selection and Reporting
Use the menu "Select all filtered lines (Ctrl+A)" and "Deselect all filtered lines (Shift+Ctrl+A)" to select all top events or none. Use the command "Export selection to CSV / Excel (Ctrl+E)" to export the selected top event gates as a text file with comma-separated values (CSV). Also, if Microsoft® Excel is installed, the report file is opened with Excel.Besides the commands available in all windows and previously presented in section I.1, this view has the following menu commands:
Command summary
Return to fault tree view (Esc) Select top event to show (left click) Scroll list (use Up/Down arrow or mouse wheel). This is inactive when the whole list is visible. Scroll list page by page (Page Up / Page Down). This is inactive when the whole list is visible. Show first top event page (Home). This is inactive when the whole list is visible. Show last top event page (End). This is inactive when the whole list is visible. Change displayed data... (F2) Use filtering and sorting / No more filtering and sorting (Ctrl+J) Show / Hide headers (Ctrl+H) Select all filtered lines (Ctrl+A) Deselect all filtered lines (Shift+Ctrl+A) Export selection to CSV / Excel (Ctrl+E)I.3. Basic Events
Sorting and Filtering
The basic events are shown with their color and selection status. In the header area of each column, clicking on the triangle will sort on this column (click twice to toggle ascending/descending). The red triangle indicates the active sort column. The rectangle above each column is used to filter the displayed list.The filter pattern syntax is the following:
Filter pattern syntax
The search is not case sensitive The "?" can be used to replace any single character The "*" can be used to replace any string of characters For numerical data, it is also possible to filter the list using a relational operator followed by a number.
The valid relational operators are =, <>, <, >, <=, and >=.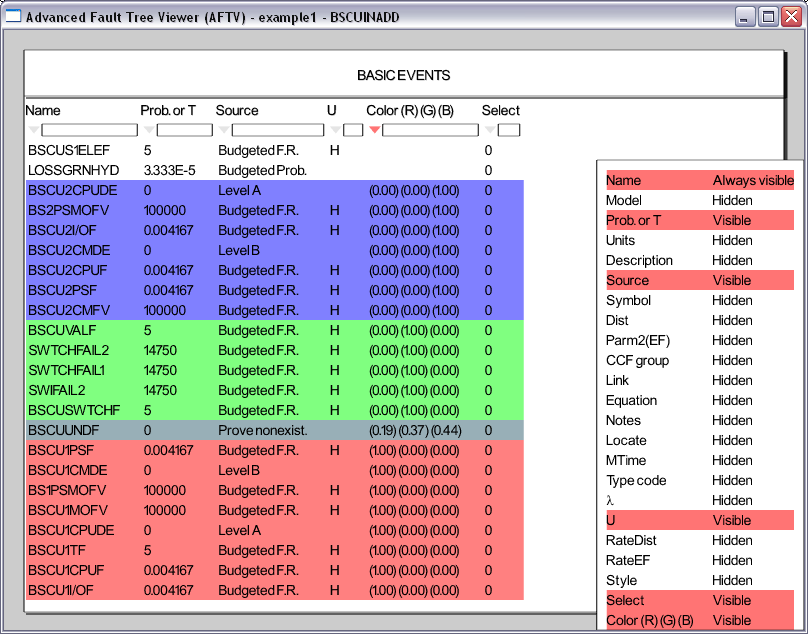
List customization
Except for the basic event name which is always shown in the first column, all the other columns can be shown or not using the "Change displayed data... (F2)" menu. The order of the columns can also be changed using this same menu.Selection and Reporting
Use the left click on any basic event to toggle its selection. Use the menu "Select all filtered lines (Ctrl+A)" and "Deselect all filtered lines (Shift+Ctrl+A)" to select all basic events or none. Use the command "Export selection to CSV / Excel (Ctrl+E)" to export the selected basic events as a text file with comma-separated values (CSV). Also, if Microsoft® Excel is installed, the report file is opened with Excel. This simple feature in combination with the list customization advanced filtering and selection provides powerful reporting capability.Besides the commands available in all windows and previously presented in section I.1, this view has the following menu commands:
Command summary
Return to fault tree view (Esc) Select/deselect basic event (left click) Deselect all basic events (double click on anything else than a basic event) Scroll list (use Up/Down arrow or mouse wheel). This is inactive when the whole list is visible. Scroll list page by page (Page Up / Page Down). This is inactive when the whole list is visible. Show first basic event page (Home). This is inactive when the whole list is visible. Show last basic event page (End). This is inactive when the whole list is visible. Change displayed data... (F2) Use filtering and sorting / No more filtering and sorting (Ctrl+J) Show / Hide headers (Ctrl+H) Select all filtered lines (Ctrl+A) Deselect all filtered lines (Shift+Ctrl+A) Export selection to CSV / Excel (Ctrl+E)I.4. Gates
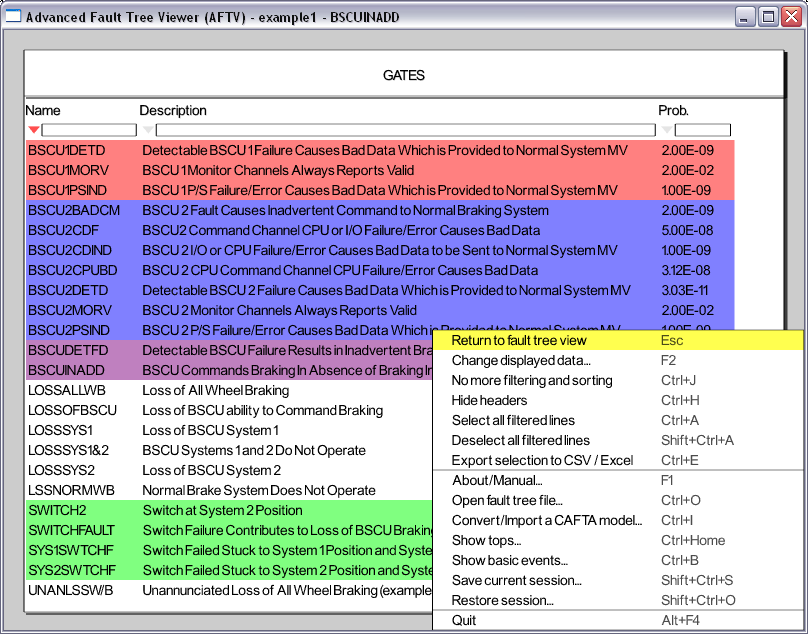
This page allows the browsing, sorting, filtering, selection, and reporting of the gates associated with the current fault tree model. There is no need to use a database software, AFTV takes care of it quite well. This page provides a simple yet powerful interface to get to the gates.
Sorting and Filtering
The gates are shown with their color and selection status. In the header area of each column, clicking on the triangle will sort on this column (click twice to toggle ascending/descending). The red triangle indicates the active sort column. The rectangle above each column is used to filter the displayed list.The filter pattern syntax is the following:
Filter pattern syntax
The search is not case sensitive The "?" can be used to replace any single character The "*" can be used to replace any string of characters For numerical data, it is also possible to filter the list using a relational operator followed by a number.
The valid relational operators are =, <>, <, >, <=, and >=.
List customization
Except for the gate name which is always shown in the first column, all the other columns can be shown or not using the "Change displayed data... (F2)" menu. The order of the columns can also be changed using this same menu.Selection and Reporting
Use the left click on any gate to toggle its selection. Use the menu "Select all filtered lines (Ctrl+A)" and "Deselect all filtered lines (Shift+Ctrl+A)" to select all gates or none. Use the command "Export selection to CSV / Excel (Ctrl+E)" to export the selected gates as a text file with comma-separated values (CSV). Also, if Microsoft® Excel is installed, the report file is opened with Excel. This simple feature in combination with the list customization advanced filtering and selection provides powerful reporting capability.Besides the commands available in all windows and previously presented in section I.1, this view has the following menu commands:
Command summary
Return to fault tree view (Esc) Select/deselect gate (left click) Deselect all gates (double click on anything else than a gate) Scroll list (use Up/Down arrow or mouse wheel). This is inactive when the whole list is visible. Scroll list page by page (Page Up / Page Down). This is inactive when the whole list is visible. Show first gate page (Home). This is inactive when the whole list is visible. Show last gate page (End). This is inactive when the whole list is visible. Change displayed data... (F2) Use filtering and sorting / No more filtering and sorting (Ctrl+J) Show / Hide headers (Ctrl+H) Select all filtered lines (Ctrl+A) Deselect all filtered lines (Shift+Ctrl+A) Export selection to CSV / Excel (Ctrl+E)I.5. Type codes
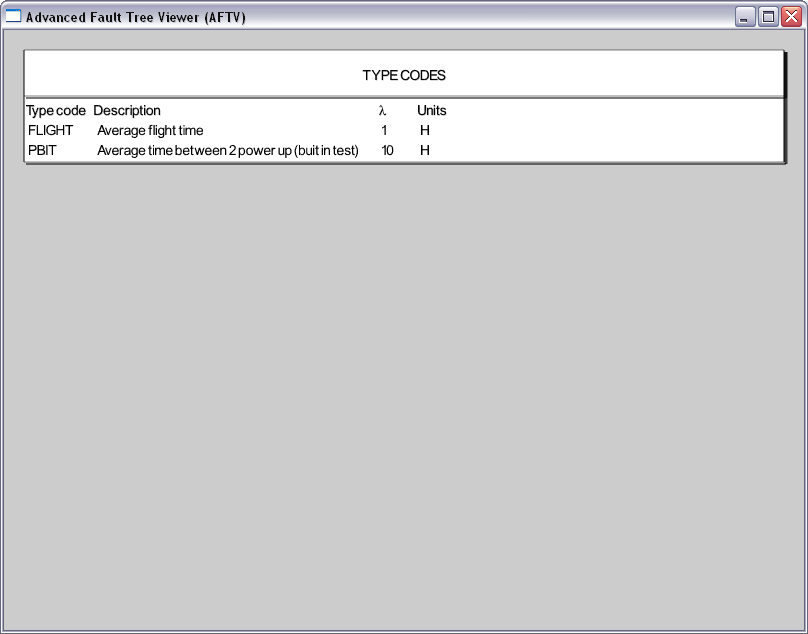 This window may not be available if type codes are not used. Type codes cannot be selected and exported.
See Basic Events window presented in section I.3. or Gates window presented in section I.4. for further description also applicable to this window.
Note that none of the examples provided in the sample directory use type codes. You will have to import your own type code model to even have the menu to display this window.
II. Command Reference
II.1. About/Manual... (F1)
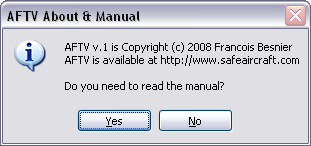
This command is always available and opens a pop up window that presents the software version and copyright information. This manual can also be opened from there.II.2. Open fault tree file... (Ctrl+O)
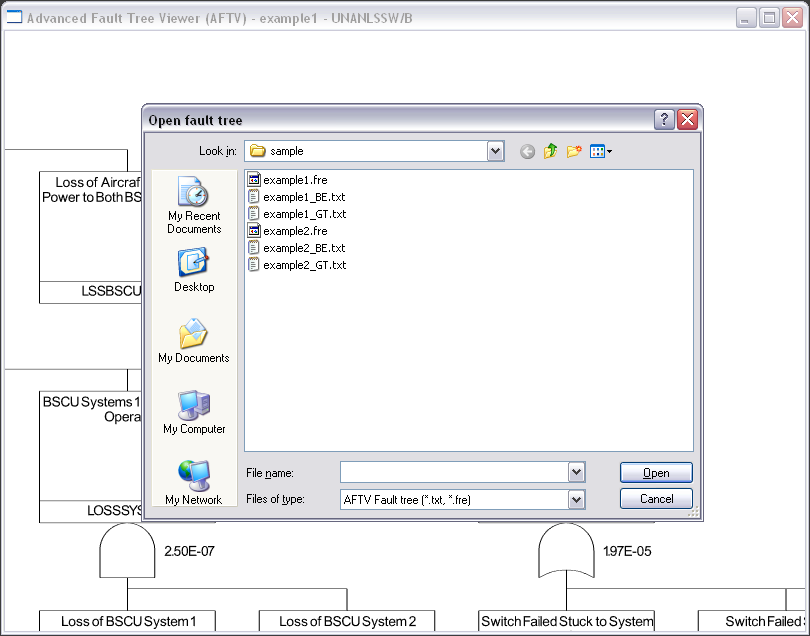
An AFTV model is made of 3 (or 4 if type code is used) different text files with different extensions (.fre and .txt).
Fault tree structure file (*.fre) Basic Event file (*_BE.fre) Gate file (*_GT.fre) [Type Code file (*_TC.fre)]The Type Code file is needed only if some of the basic events data is defined using type codes.
Opening any of the 3 (or 4) files presented above opens the associated AFTV model. None of the models in the "sample" directory (typically is C:\Program Files\AFTV\sample\) use type codes (see screenshot).
Upon opening of AFTV a minimal "empty" model is always opened by default. A model can also be loaded upon ATFV startup by passing any AFTV file as parameter (see "Section III.1 Command Line parameter").
Note that the name of the current fault tree model opened is displayed in the AFTV title bar.
II.3. Convert/Import a CAFTA model... (Ctrl+I)
The command prompts for:
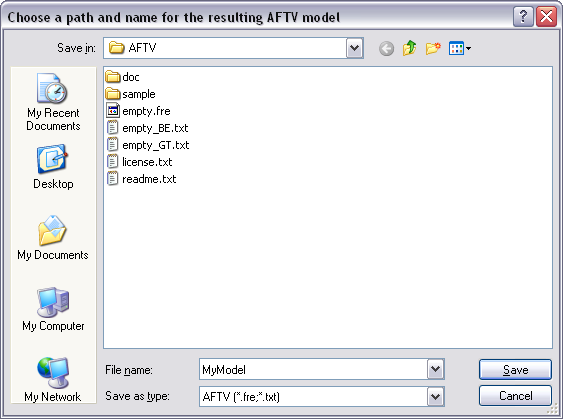
New AFTV model name (e.g., "MyModel"), the CAFTA™ fault tree file (*.caf), the associated fault tree database file (*.rr or *.mdb).It then calls CAFTA™ and Microsoft® Access® (which means that the CAFTA™ conversion will only works if both CAFTA™ and Microsoft® Access® are installed on the PC running AFTV) and produces the following files:
MyModel.fre, MyModel_BE.txt, MyModel_GT.txt, and MyModel_TC.txt.If needed, refer to the FAQ for troubleshooting this command.
This command actually calls an external converter script called "AFTVconverter.exe" located in the main AFTV installation directory (typically is C:\Program Files\AFTV\). The source code of "AFTVconverter.exe" is an AutoIt v3 script ("AFTVconverter.au3") also available in the AFTV installation directory. AutoIt v3 is available free of charge and can be downloaded at http://www.autoitscript.com/autoit3/.
II.4. Show tops... (Ctrl+Home)
This command is always available and is used to call the Top Events window presented in section I.2. It also cancels any temporary top of page (set using the "Make this gate a page top (Page Down)") by resetting a top event as a top of page.II.5. Show basic events... (Ctrl+B)
This command is always available and is used to call the Basic Events window presented in section I.3.II.6. Show gates... (Ctrl+G)
This command is always available and is used to call the Gates window presented in section I.4.II.7. Show type codes... (Ctrl+T)
This command is always available and is used to call the Type Codes window presented in section I.5.II.8. Save current session (Shift+Ctrl+S)
This command is always available and is used to save the full context of AFTV in order to quickly restore it later with the "Restore session (Shift+Ctrl+O)" command. The full AFTV context consists of about a hundred internal variables and tables, the open/close status of every gate, the color and selection state of every basic event or gate. A save dialog window prompts for the filename and path where to save the session (".ses" extension). By default, the proposed session file name is "[model name]-[top event name].ses"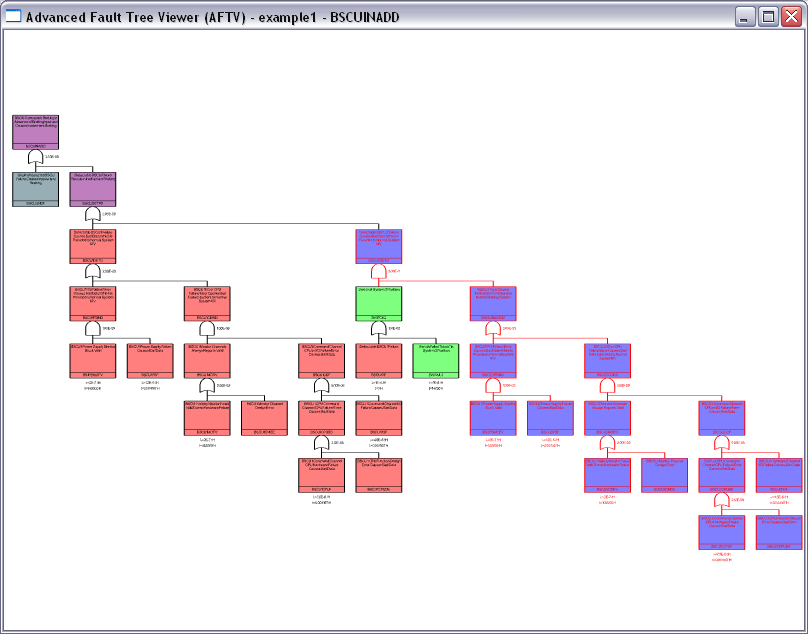
For instance, the view shown on the right screenshot can be restored from session file "example1-BSCUINADD.ses" located in the "sample" directory.
However, note that restoring this session will work only if the path to the sample directory is C:\Program Files\AFTV\sample\.
II.9. Restore session (Shift+Ctrl+O)
This command is always available and is the pending command of "Save current session (Shift+Ctrl+S)". It restores the full AFTV state previously saved by the "Save current session (Shift+Ctrl+S)" command. An open dialog window prompts the user for the filename and path to the session to load (".ses" extension).Note that a session can also be restored upon ATFV startup by passing the session filename as parameter (see "Section III.1 Command Line options").
II.10. Quit (Alt+F4)
This command is always available. It is used to quit AFTV and does not ask for confirmation. It has the same effect as clicking on the red cross in the upper right corner of AFTV.II.11. Make this gate a page top (Page Down)
This command is available only in the Fault Tree View and makes the selected gate a temporary top of page.The effect of this command is cancelled by the "Open fault tree file... (Ctrl+O)" or the "Show tops... (Ctrl+Home)" commands.
II.12. Develop / Close gate (Ctrl+L)
This command is available only in the Fault Tree View and when the whole fault tree is not forced to be fully developed using the command "Show fully developed tree (Ctrl+Shift+F12)".This command is used to develop or close a selected fault tree branch. The branch still exists but is simply hidden. It is mainly used to hide a non-pertinent branch in order to focus only on the remaining fault tree branches.
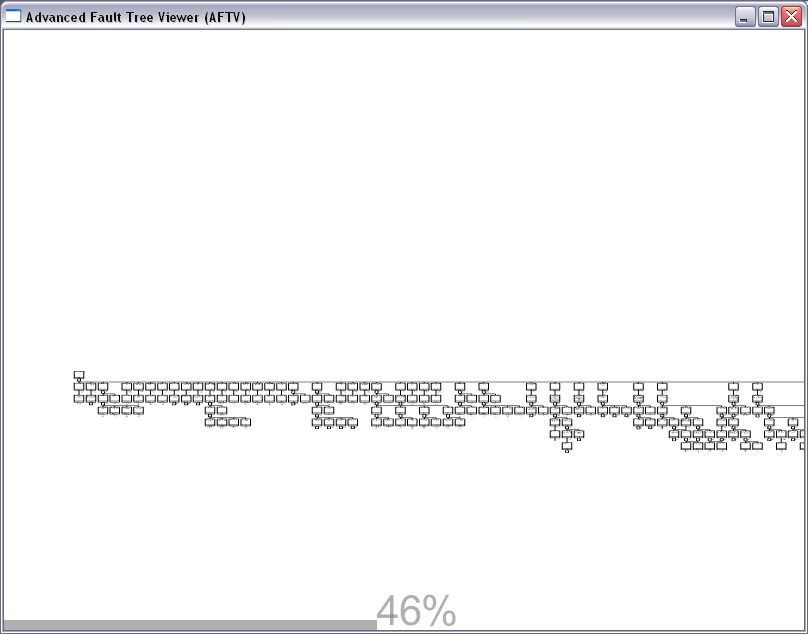
II.13. Show fully developed tree / No more fully developed tree (Ctrl+Shift+F12)
This command is available only in the Fault Tree View and is used to force (or not) the full display or the fault tree, regardless of the open/close state of each gate set by the "Develop / Close gate (Ctrl+L)" command. By default the display of every branch is only shown once. On very large models and PCs with poor OpenGL® hardware acceleration performance, forcing a full display can cause AFTV to be relatively slow. Note however that AFTV times itself and adapts the display algorithm accordingly, to even provide acceptable performance with huge models. Nevertheless, this option is deactivated by default.II.14. Display all cell data / No display of all cell data (F9)
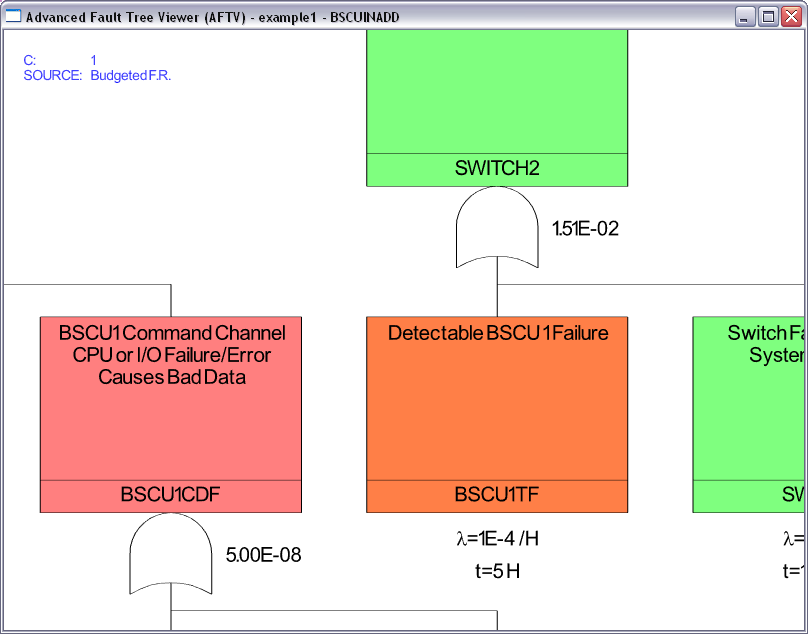
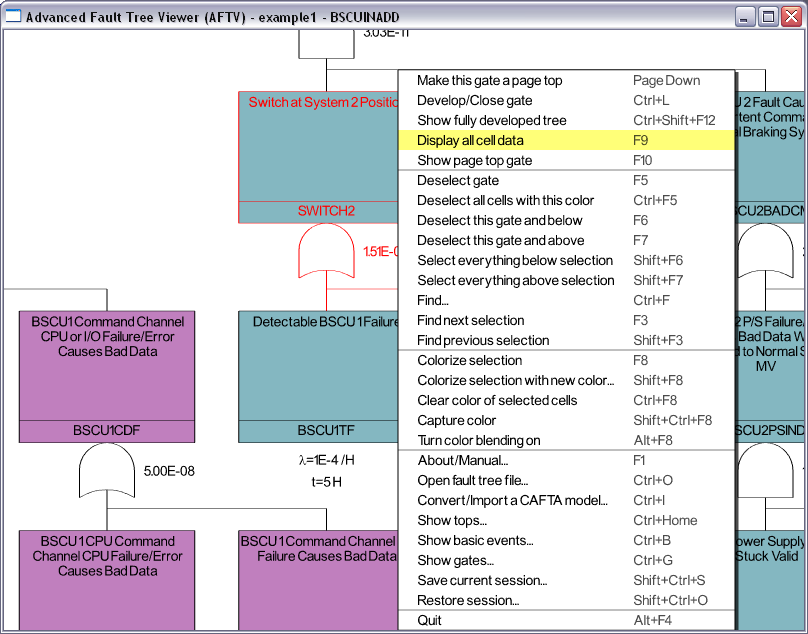
When the display of all cell data is active, the extra information on a gate or basic event in focus (shown in yellow when cell is white, orange on the right screenshot) is displayed in blue in the top left part of the screen. Redo the command to cancel this display.
Note that all this information on any given cell can always be made visible (eventually using the "Change displayed data... (F2)" menu) in the Basic Events window or in the Gates window.
II.15. Show page top gate (F10)
This command is available only in the Fault Tree View and is used to display the current top event (or temporary page top defined by the "Make this gate a page top (Page Down)" command).II.16. Select / Deselect gate / basic event (F5)
This command is available only in the Fault Tree View and is used to toggle the select state of the gate or basic event in focus (i.e., flashing yellow cell when cell is white).II.17. Select / Deselect all cells with this color (Ctrl+F5)
This command is available only in the Fault Tree View and is used to toggle the select state of all fault tree basic events or gates that have the same color as the cell in focus.II.18. Select / Deselect this gate and below (F6)
This command is available only in the Fault Tree View and is used to toggle the select state of all the fault tree basic events or gates in the branch below the gate in focus. For instance, this command can be used to identify all the basic events involved in a specific top event.
II.19. Select / Deselect this gate / basic event and above (F7)
This command is available only in the Fault Tree View and is used to toggle the select state of all the fault tree basic events or gates in the branch above the gate or basic event in focus. For instance, this command can be used to identify all the tops events (i.e., consequences) impacted by a specific event (i.e., cause).
II.20. Select everything below selection (Shift+F6)
This command is available only in the Fault Tree View and is used to select all the fault tree basic events or gates below all the gates currently selected. For instance, this command can be used to identify all the basic events involved in a multiple top events without having to run the Select / Deselect this gate and below (F6) command multiple times.
II.21. Select everything above selection (Shift+F7)
This command is available only in the Fault Tree View and is used to select all the fault tree basic events or gates above in the branch above all the cells currently selected. For instance, this command can be used to identify all the tops events (i.e., consequences) impacted by multiple events (i.e., cause) without having to run the Select / Deselect this gate / basic event and above (F7) command multiple times.
II.22. Find... (Ctrl+F)

Pressing "Esc" cancels the search and returns to the main fault tree view. Pressing "Enter" launches the search using the current search pattern. In both cases, once this window is closed, AFTV returns to the main fault tree view.
Search pattern syntax
The search is not case sensitive The "?" can be used to replace any single character The "*" can be used to replace any string of characters The filtered lists of the Basic Events and Gates windows provide more powerful search capabilities. For instance, using these lists, it is possible to extend the scope of the search to any cell attribute like the notes or the source fields.
The find command deselects any cell previously selected prior to performing the search. If needed, use the "Colorize selection with new color... (Shift+F8)" then later "Select all cells with this color (Ctrl+F5)" commands to
save / restore your selection.
II.23. Find next selection (F3)
This command is available only in the Fault Tree View and is used to cycle through all the selected cells, from left to right then top to down. The cell in focus is displayed in glowing red and is shown centered on the screen. Note that the scope of this command is not limited to the fault tree displayed. If all the selected cells on the current fault tree have been viewed and more selected cells are to be displayed on another fault tree, the new fault tree is automatically displayed. Finally note that AFTV implements a smooth animation to move from cell to cell to make sure that the analyst never loses track of the global location of the cell being looked at.II.24. Find previous selection (Shift+F3)
This command is available only in the Fault Tree View. It is similar to the previous one but is used instead to cycle through all the selected cells from right to left then down to top.II.25. Colorize [selection] (F8)
This command is available only in the Fault Tree View and is used to colorize the cell in focus or the selection if the cell in focus is selected. The color used for the command is the last color picked using the "Colorize [selection] with new color... (Shift+F8)" command. By default, the initial color is a grey. Note also that when the color blending is turned on (see "Turn color blending on/off (Alt+F8)"), this command actually mixes the color of the cell in focus (or the selection) with the last color picked.II.26. Colorize [selection] with new color... (Shift+F8)
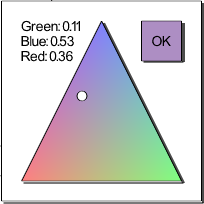
Note that in order to be able to display the content of all cells, only light colors are allowed as cell background colors. AFTV averages all colors picked with a pure white to lighten all cell background colors. Note also that when the color blending is turned on (see "Turn color blending on/off (Alt+F8)"), this command actually mixes the color of the cell in focus (or the selection) with the color picked.
II.27. Clear color [of selected cells] (Ctrl+F8)
This command is available only in the Fault Tree View and is used to clear the color of a cell in focus (or of the selection if the cell in focus is selected).II.28. Capture color (Shift+Ctrl+F8)
This command is available only in the Fault Tree View and is used to set the current color with the color of the cell in focus. This command is typically used before the "Colorize [selection] (F8)" command to colorize more cells with the same color.II.29. Turn color blending on/off (Alt+F8)
This command is available only in the Fault Tree View and is used to set or reset the color blending between successive colorings of the same cells. Having colors blend is typically useful to represent intersections between selections of gates or basic events.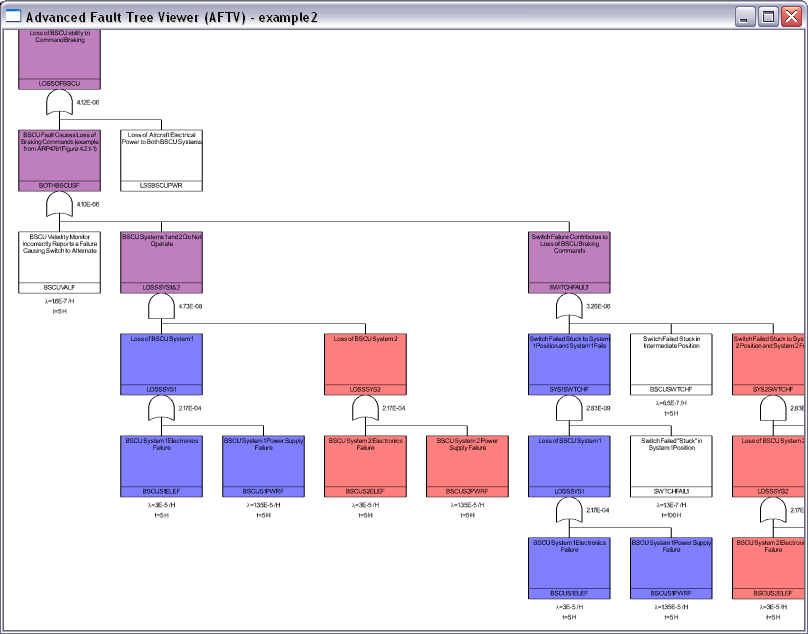 First turn color blending on. Select a first set of basic events. Select menu "Select everything above selection (Shift+F7)". Select menu "Colorize [selection] with new color... (Shift+F8)" and select a red. Double click on the background to remove the selection. Select the second set of basic events. Select menu "Select everything above selection (Shift+F7)". Select menu "Colorize [selection] with new color... (Shift+F8)" and select a blue. Double click on the background to remove the selection. Select menu "Select / Deselect all cells with this color (Ctrl+F5)" on any purple gate. Select menu "Show gates... (Ctrl+G)." Clear all filter (if any). Select menu "Change displayed data... (F2)" to select what information is to be exported. Select menu "Export selection to CSV / Excel (Ctrl+E)".
The view shown on the previous screenshot was made using the previous procedure. This session can be restored using the session file "example2.ses" located in the "sample" directory.
However, note that restoring this session will work only if the path to the sample directory is C:\Program Files\AFTV\sample\.
Note that you can also use the Basic Events window or the Gates window to sort or filter the cells based upon their color.
You may have to use the menu "Change displayed data... (F2)" to display the "Color (R) (G) (B)" data if the cell color information is not yet displayed.
Once the list is sorted by color, the next typical commands are to select and export the cells colorized in the color representing the set of selections of interest to the analyst.
II.30. Return to fault tree view (Esc)
This command is available in all windows (other than the Fault Tree View) to return to the main Fault Tree View.II.31. Copy (Ctrl+C or Ctrl+Insert)
This command is available for the Top Events, Basic Events, Gates, and Type Codes windows. It is used within text inputs to copy search or filter patterns onto the Windows® clipboard.II.32. Paste (Ctrl+V or Shift+Insert)
This command is available for the Top Events, Basic Events, Gates, and Type Codes windows. It is used within text inputs to paste text from the Windows® clipboard into search or filter patterns.II.33. Cut (Ctrl+X)
This command is available for the Top Events, Basic Events, Gates, and Type Codes windows. It is used within text inputs to cut search or filter patterns onto the Windows® clipboard.II.34. Use filtering and sorting / No more filtering and sorting (Ctrl+J)
This command is available for the Top Events, Basic Events, Gates, and Type Codes windows. It is used to display (or not display) the filters and sort buttons. All filters are cleared when the list filtering and sorting is not used.II.35. Show / Hide headers (Ctrl+H)
This command is available for the Top Events, Basic Events, Gates, and Type Codes windows. It is used to display (or not display) the headers.II.36. Change displayed data... (F2)
Click on the data name to toggle between Visible and Hidden and press any key to return to the list window.
Note that the first list item, which is the cell (or type code) name is always visible.
By changing the order in which data is clicked in the list, it is also possible to change the respective location of all columns.
However, the name (or type code) column cannot be moved and remains first.
II.37. Select all filtered lines (Ctrl+A)
This command is available for the Top Events, Basic Events, Gates, and Type Codes windows. It is used to select all filtered (i.e., visible) lines of the list window.II.38. Deselect all filtered lines (Shift+Ctrl+A)
This command is available for the Top Events, Basic Events, Gates, and Type Codes windows. It is used to deselect all filtered (i.e., visible) lines of the list window.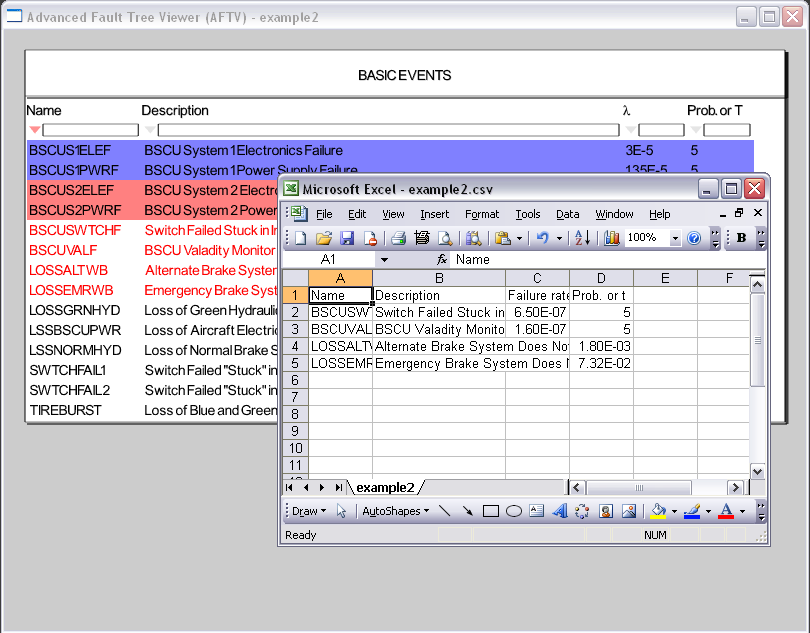
II.39. Export selection to CSV / Excel (Ctrl+E)
This command is available for the Top Events, Basic Events, Gates, and Type Codes windows.This command is first used to export the list being viewed as a text file with comma-separated values (CSV).
A save dialog window prompts for the filename and path where to save the CSV report.
By default, the proposed file name is "[model name].csv".
Also, if Microsoft® Excel is installed, this command opens the exported file in Excel.
III. Miscellaneous
III.1. Command line parameter
Add a session filename to the command line to open AFTV and restore the session.Add a model name (or any filename part of the model) to the command line to open AFTV with the model.
III.2. Automatic Update
Note that if there is no valid Internet connection, no error message is displayed, the AFTV update is simply skipped.
The update function is performed by a dedicated executable called "AFTVupdater.exe", which is located in the main AFTV installation directory (typically C:\Program Files\AFTV\).
Note that since the size of the AFTV installation file is only about 5 MB, the whole update process takes typically less than a minute.
III.3. Background display processing